How to Write a Property Description That Sells: A Practical Australian Guide
What makes a buyer pause on one listing and scroll past another? Learning how to write a property description that sells isn’t about piling on superlatives. It’s about helping the right buyer picture daily life in the home and giving them a clear, honest sense of what they’ll find at an inspection.
It can be tricky to choose a distinctive angle, decide which details deserve space and keep the language appealing without overpromising. The strongest descriptions make a home’s real advantages easy to understand, whether that’s a practical layout, useful storage or a sunlit living area.
This guide shows you how to turn verified details into a concise, buyer-focused listing that’s easy to scan online. You’ll learn what to prioritise, how to replace tired clichés and why accuracy matters across both words and images. In Australia, property advertising must not create a misleading impression, so compelling copy should also be truthful.
Key Takeaways
- Learn how to write a property description that sells by connecting verified features with the lifestyle they can support.
- Prepare before drafting: consider who the home’s features may suit, gather accurate property facts and choose the details that matter most.
- Use a flexible structure to lead with the home’s strongest appeal, then add useful specifics and a clear inspection invitation.
- Replace clichés and inflated claims with precise, easy-to-scan language.
- Bring the description, professional photography and listing details together so they present a consistent, accurate picture of the property.
Why a well-written property description matters to Australian buyers
A property description connects confirmed features to the lifestyle they may support. It helps buyers understand not just what a home contains, but how its layout and practical details could work for everyday life. The aim is to help suitable buyers decide whether the property deserves a closer look.
Photographs show what rooms and outdoor spaces look like; the description adds context. Explain how living areas connect, where storage is located or what a flexible room could be used for, as long as those details are accurate. Together, words and images help buyers build a fuller picture before arranging an inspection. This is one part of the wider real estate business, where marketing communicates a property’s features to potential buyers.
An effective property description is specific, accurate and centred on benefits that matter to buyers. Relevant detail is more persuasive than hype. Calling a home “perfect” or “unmissable” doesn’t explain what makes it worth seeing. If it’s accurate, saying the kitchen opens onto a covered outdoor area gives buyers something concrete to consider and sets a realistic expectation.
What buyers need from a property listing description
Online readers are deciding whether a home fits their needs before making time for an inspection. Make the essentials easy to understand: the confirmed features, how the rooms are arranged and what practical advantages follow from that layout. A clear description helps buyers assess whether the home offers space for working from home, a separate area for guests or an outdoor setting they’ll use. For investors evaluating rental potential, transparent details about layout and amenities also make it easier to judge suitability for executive or leisure stays through short-term letting specialists like Home Vacay.
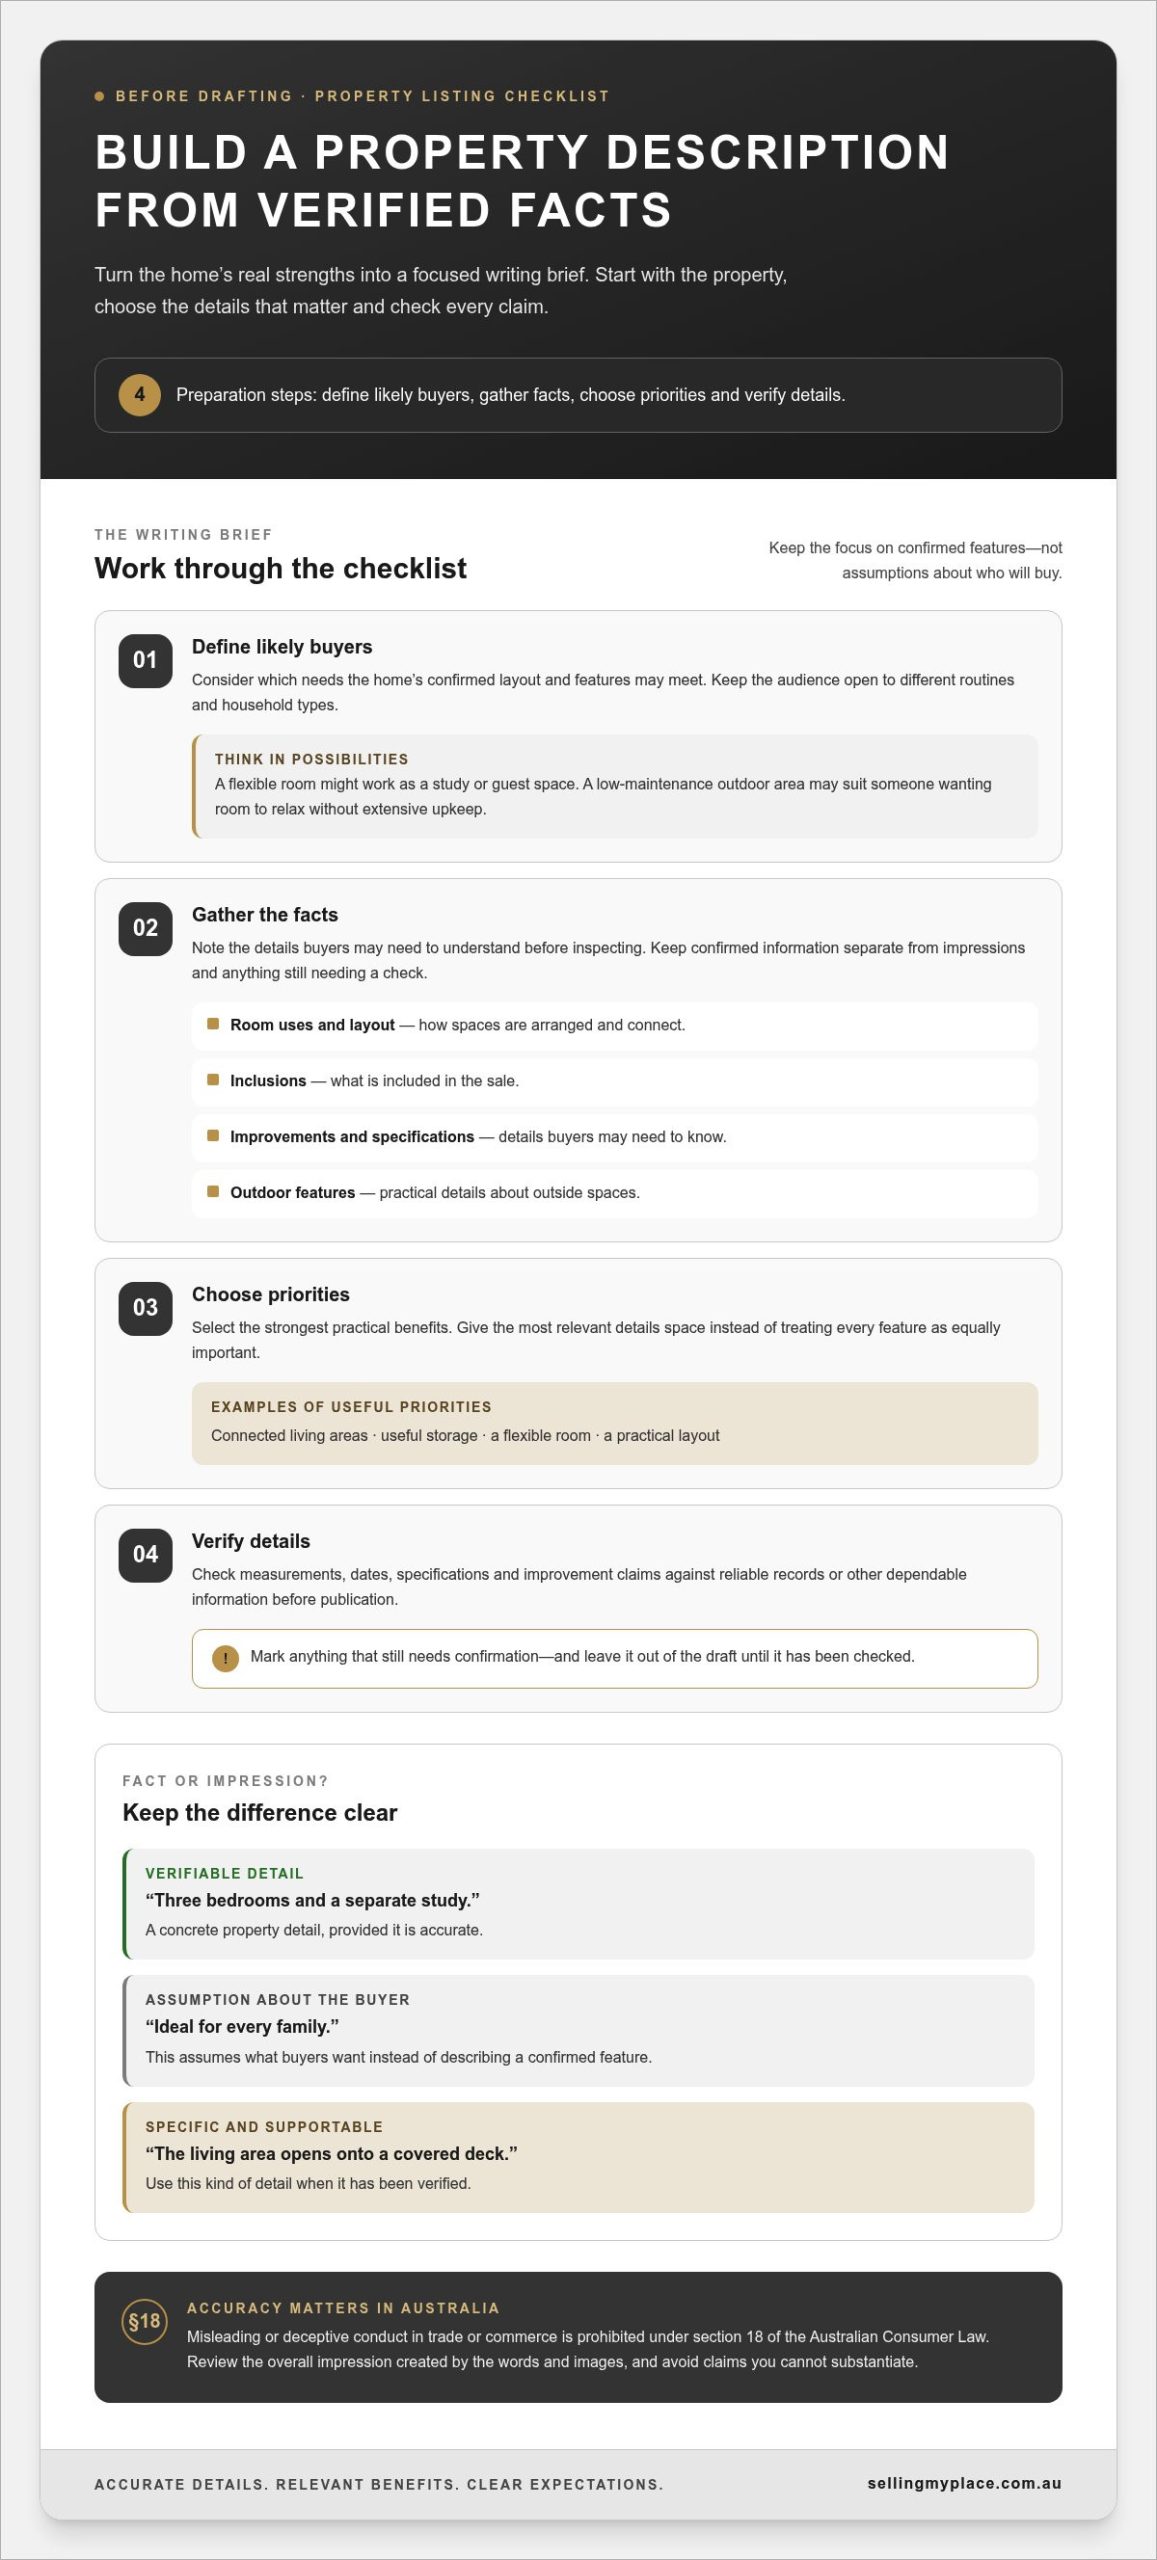
Keep facts distinct from promotional phrasing. “Three bedrooms and a separate study” is verifiable; “ideal for every family” assumes what buyers want. Give readers enough context to decide whether to explore further, without suggesting that one type of buyer will suit every home.
Why accuracy makes persuasive copy more convincing
Specific, supportable details give buyers a sound basis for interest and help avoid a mismatch between the listing and the inspection. If a description promises generous storage, for instance, buyers should be able to identify the storage when they visit. Vague praise can create expectations the property doesn’t meet.
In Australia, misleading or deceptive conduct in trade or commerce is prohibited under section 18 of the Australian Consumer Law. Review the overall impression created by the words and images, not just whether each sentence sounds appealing. Avoid unsupported superlatives, assumptions about how buyers will feel and claims you can’t substantiate. A truthful description won’t promise a sale, but it can help attract interest from people whose needs align with the property.
Before drafting, identify the right buyer and gather the property facts
Preparation makes the writing clearer and the final listing more dependable. Before reaching for a catchy opening, consider who the home’s features may suit, collect relevant details, choose what deserves emphasis and verify every claim. This turns scattered notes into a useful brief, so the description focuses on the property rather than guesswork.
Build a buyer profile from the home’s real strengths
Start with the home, not a stereotype of its future owner. A flexible room might work as a study or guest space; a low-maintenance outdoor area may appeal to someone who wants room to relax without extensive upkeep. These are possibilities, not promises. Prioritise relevant facts over trying to appeal to everyone, and connect each genuine feature to a practical benefit without assuming who will buy.
Use this preparation process to move from broad impressions to a focused writing brief:
- Define likely buyers. Consider which needs the home’s confirmed layout and features may meet. Keep the audience open to different routines and household types.
- Gather the facts. Note room uses, inclusions, improvements and other features buyers may need to understand before inspecting.
- Choose priorities. Select the strongest practical benefits, such as connected living areas or useful storage, rather than giving every detail equal weight.
- Verify details. Check measurements, dates, specifications and improvement claims against reliable records or other dependable information before publication.
Create a verified fact sheet before you write
Keep confirmed information separate from personal impressions and details that still need checking. “The living area opens onto a covered deck” is factual if verified; “the perfect spot for entertaining” is an opinion about how a buyer may use it. For clear, reader-focused wording, the Australian Government Writing Handbook offers a useful reference. This distinction keeps the copy engaging without blurring fact and promotion.
Group details on a fact sheet under headings such as layout, inclusions, improvements and outdoor features. Mark anything that needs confirmation and leave it out of the draft until checked. Prioritise facts that help buyers understand the home and decide whether an inspection makes sense. A room’s actual use, what’s included in the sale and verified specifications are usually more useful than decorative adjectives.
This groundwork is the practical starting point for how to write a property description that sells: choose a relevant audience, build the story from accurate details and edit out assumptions. If you’re preparing your sale, explore pre-sale property support as part of planning your listing.
How to structure a property description buyers can scan
A useful listing guides readers from first impression to practical detail without making them search for the essentials. Try this sequence: opening hook, strongest features, useful specifics, then a simple invitation to inspect or enquire. Treat it as a framework, not a formula. The order depends on the home’s verified strengths, and the aim is to make important information easy to absorb on a phone screen.
Short paragraphs give readers space between ideas. Give each sentence a clear job: introduce a feature, explain why it may matter or clarify a relevant detail. Don’t cram every inclusion into one long paragraph. Buyers have different priorities, so broad Australian housing market statistics may provide context, but the description should stay focused on this particular property.
Write an opening that earns the next few seconds
Lead with a distinctive, verifiable feature or combination of features, rather than a generic claim. If a home has a separate studio and a private courtyard, for example, those confirmed details give readers a reason to continue. The opening should orient them to the property, not repeat the listing headline or rely on phrases such as “something special”. If you use a broad claim, show what supports it in the next sentence.
Turn features into clear, specific benefits
Pair each selected feature with a practical use, while letting buyers decide what suits them. A built-in desk nook may offer a place to work or study; describe it plainly rather than promising a better work-life balance. Use sensory language only when it reflects what buyers can genuinely experience. Follow with useful details and a calm invitation to arrange an inspection or make an enquiry.
Here’s a template, not a description of a real property. Replace each prompt with details you’ve verified:
- Opening: Introduce the home through its most distinctive confirmed feature.
- Key appeal: Describe the strongest practical features and how they may be useful.
- Specifics: Add relevant information about layout, inclusions or other confirmed details.
- Next step: Invite interested buyers to arrange an inspection or enquire.
Keep the structure adaptable. A home with a standout layout might lead with how its rooms connect; another may be better introduced through a confirmed feature that sets it apart. Put the most buyer-relevant information early, then add context rather than repeating the same selling point in different words. That’s the practical heart of how to write a property description that sells: make each line clear, useful and grounded in the home itself.
Edit property description wording for clarity, accuracy and appeal
A first draft captures what you want buyers to notice. Editing helps you decide what they need to know. Read each sentence with a buyer’s questions in mind: does it add a verified detail, explain a practical benefit or help someone understand the home? If it does none of those things, trim it.
Replace clichés and vague adjectives with evidence
Words such as “stunning”, “spacious” and “perfect” can sound positive, but without supporting detail they leave buyers guessing. Replace them with an observable feature: instead of “a spacious kitchen”, describe its confirmed bench space, storage or connection to another room. Use comparisons only when you can explain the basis and support them fairly. Specific wording helps readers picture the home without asking them to take your praise on trust.
Use this paired checklist as you revise:
- Keep: Verifiable details, clear descriptions of layout and inclusions, and benefits that follow naturally from those facts.
- Cut: Repeated points, familiar clichés, strings of similar adjectives and inflated claims the property’s features don’t support.
For example, if two sentences both say the living area is “light-filled” and “bright”, keep the stronger one and use the space for a different useful detail. A precise fact gives buyers more to consider than another layer of praise. Likewise, instead of saying “perfect for entertaining”, explain what supports that impression, such as a confirmed connection between the dining area and an outdoor space, or leave the claim out.
Comparisons need care, too. Say a home is “larger than others nearby” only if you have a sound, like-for-like basis for the claim. Otherwise, focus on the property’s own measurable or observable features. That keeps the description persuasive without stretching what it promises.
If you’re refining your listing alongside a broader sale plan, explore property listing support.
Run a final accuracy and readability check
Before publishing, compare every factual statement with the property information and listing details. Check that room names, inclusions, measurements, dates and specifications are consistent, and that the wording doesn’t imply a feature the home doesn’t have. Then review spelling, punctuation, tense and paragraph breaks. Short blocks of text are easier to follow on a phone.
Read the draft aloud. You’ll often hear repeated ideas, awkward phrases or sentences that try to do too much. A trusted reader can flag anything unclear, but keep your own perspective in the final copy. A useful edit sharpens the message without flattening your voice.
This final pass is central to how to write a property description that sells: retain what’s distinctive and supportable, remove what’s vague, and make sure the finished words match the home buyers will see.
Publish your property description with clear photos and listing details
Before the listing goes live, review the full presentation as a buyer would encounter it. The description, photographs and listing details should tell one consistent story: the words explain what matters, the photos show the home, and the listing information helps buyers understand what’s being offered. A polished description can’t do its job if key details are hard to find or images create a different impression.
Make the description and listing presentation work together
Compare each claim in the copy with what the photographs show. If you describe a room as a study, make sure the wording doesn’t imply it’s a separate bedroom. If the description highlights an outdoor area, check that the images give buyers a clear view of the space. Each element should support an accurate overall picture.
Professional photography is included in every Kincade International Direct Sales package. Use the copy to add context rather than narrate what’s already obvious in a photograph. A photo may show a dining area, for instance, while a concise sentence can explain how it connects to another part of the home, if that layout detail is accurate.
Before publishing, check that essential listing details are complete and consistent with the description. Keep room uses, inclusions and other relevant facts easy to locate. Don’t bury a key qualification in promotional wording or repeat the same feature in the description, headline and listing fields when it’s already clear. Buyers should be able to scan the page and understand the home without piecing together conflicting details.
Manage enquiries after the listing goes live
Good presentation is only one part of publishing. Sellers also need a practical way to follow up on interest once the listing is online. Kincade International Direct Sales (KIDS) is a licensed intermediary for listing purposes, not a real estate agent. Every package includes a listing on major property portals such as Homely and Soho, enquiry forwarding by SMS and email, 24/7 seller dashboard access and a Market Valuation Report.
Use the dashboard and forwarded enquiries to keep track of buyer interest. Note any questions that point to unclear listing details, and make sure your responses align with the information shown in the listing. If a detail needs correcting, update the relevant listing information so the copy and other materials continue to match. KIDS listings remain active until sold or withdrawn, or for two years from the commencement date, whichever occurs first.
The packages are fixed-fee and commission-free: Classic is $799 ex GST, Signature is $999 ex GST, and Prestige is $1,999 ex GST. Signature and Prestige include a dedicated property website and URL; Prestige also includes 15-20 professional photographs, a floorplan redraw, a Facebook and Instagram ad campaign, 50 premium A4 brochures, a dedicated specialist and a James Edition listing. All listed package features are included in the flat fee. KIDS does not guarantee a sale or sale price. Sellers remain in control of their listing and enquiries, while KIDS provides the listing platform and included marketing features.
Taking care with how to write a property description that sells also means checking how it works in the live listing, not just on the page where you drafted it. For support with listing your property and managing buyer enquiries, explore listing support with KIDS.
Take the next step with confidence
Your property description is part of the way you introduce a home and invite the right people to take a closer look. Before publishing, ask whether buyers can understand the home’s appeal, find the details that matter and see a clear path to enquire.
That’s the heart of how to write a property description that sells. It’s not about finding the loudest phrase or promising a particular result. It’s about presenting a home with care, so interested buyers can make an informed choice about whether it could suit them. A thoughtful listing gives you a clear starting point for the conversations that follow.
Ready to prepare your listing? Explore listing support with KIDS and take the next step with a clear picture of what your home has to offer.
Frequently Asked Questions
How long should a property description be?
There’s no single ideal length. Include enough detail to help buyers understand the home without making them sift through unnecessary copy. Remove sentences that repeat a feature or add no new information. Preview the listing in its intended format, as text may appear differently on a phone, and check the platform’s current field limits before you publish.
Should I write a property description in first person or third person?
Either voice can work, provided it stays natural and consistent. First person can add a personal touch, such as explaining why an owner values a particular feature. Third person often keeps attention on the property itself. Avoid turning personal opinion into a claim about buyers: “we love the garden” is clearly an owner’s view, while “every buyer will love the garden” assumes a reaction you can’t guarantee.
Can I use emotional language in a property description?
Yes, as long as the feeling comes from real features rather than replacing useful information. You might describe morning light in a room if that reflects the home’s actual conditions, then give readers a concrete detail about the room or its layout. Keep emotional phrasing measured, and don’t promise buyers will feel at home or enjoy a particular lifestyle. The property’s facts should carry the description.
What words should I avoid in a property description?
Be wary of sweeping superlatives and familiar phrases that could fit almost any listing. “Perfect”, “stunning” and “one of a kind” tell buyers little unless you explain the specific, supportable feature behind the claim. Remove language that implies a room or inclusion has a use or status it doesn’t have. Replacing broad praise with a precise description gives readers something tangible to assess.
Should I include the property’s flaws in the description?
Describe the home honestly and don’t use positive wording to disguise a concern or create a false impression. How to handle a defect or other potentially important information can depend on the circumstances and applicable requirements, so marketing copy isn’t a substitute for legal guidance. For questions about disclosure obligations or sale documents, seek advice from a qualified conveyancer or solicitor. KIDS does not provide legal advice, contracts or conveyancing services.
Can I update a property description after the listing goes live?
Whether and how you can edit a live listing depends on the platform and listing arrangement. If you revise the copy, check that the change matches the property information, photographs and other listing fields, then review the published version to make sure it displays as intended. KIDS sellers can use the 24/7 seller dashboard to manage their listing and buyer enquiries as details or communication needs change.
How to Create a Property Floor Plan: A Practical Guide
A useful floor plan depends on accurate measurements, not fancy software. If you’re wondering how to create a property floor plan, it can be hard to know where to start: which rooms and openings should you include, and how precise do your measurements need to be? A confusing sketch can leave buyers with more questions than answers.
A clear plan should represent the home faithfully, but you don’t have to be a designer to make a useful start. Measure each space, record doors, windows and other important details, then sketch and check the layout so it’s easy to follow.
You’ll also learn when a hand-drawn plan or digital tool may suit your needs, and when professional preparation could help present a property for sale. A simple sketch can be a useful first draft. For listing materials, sellers may also consider a professionally prepared plan. The aim is straightforward: give prospective buyers a clearer sense of how the home connects, room by room.
Key Takeaways
- Learn how to create a property floor plan by recording the rooms and features buyers need to understand the layout.
- Follow a practical measuring sequence, from gathering simple tools to checking room dimensions and your sketch.
- Choose a hand sketch, digital tool or professionally prepared plan based on how you’ll use the finished drawing.
- Check dimensions, labels and layout before sharing the plan. A tidy appearance can’t make inaccurate details reliable.
- Use your floor plan alongside property photography to give prospective buyers a clearer sense of how the home’s spaces connect.
What a property floor plan shows and why it matters to buyers
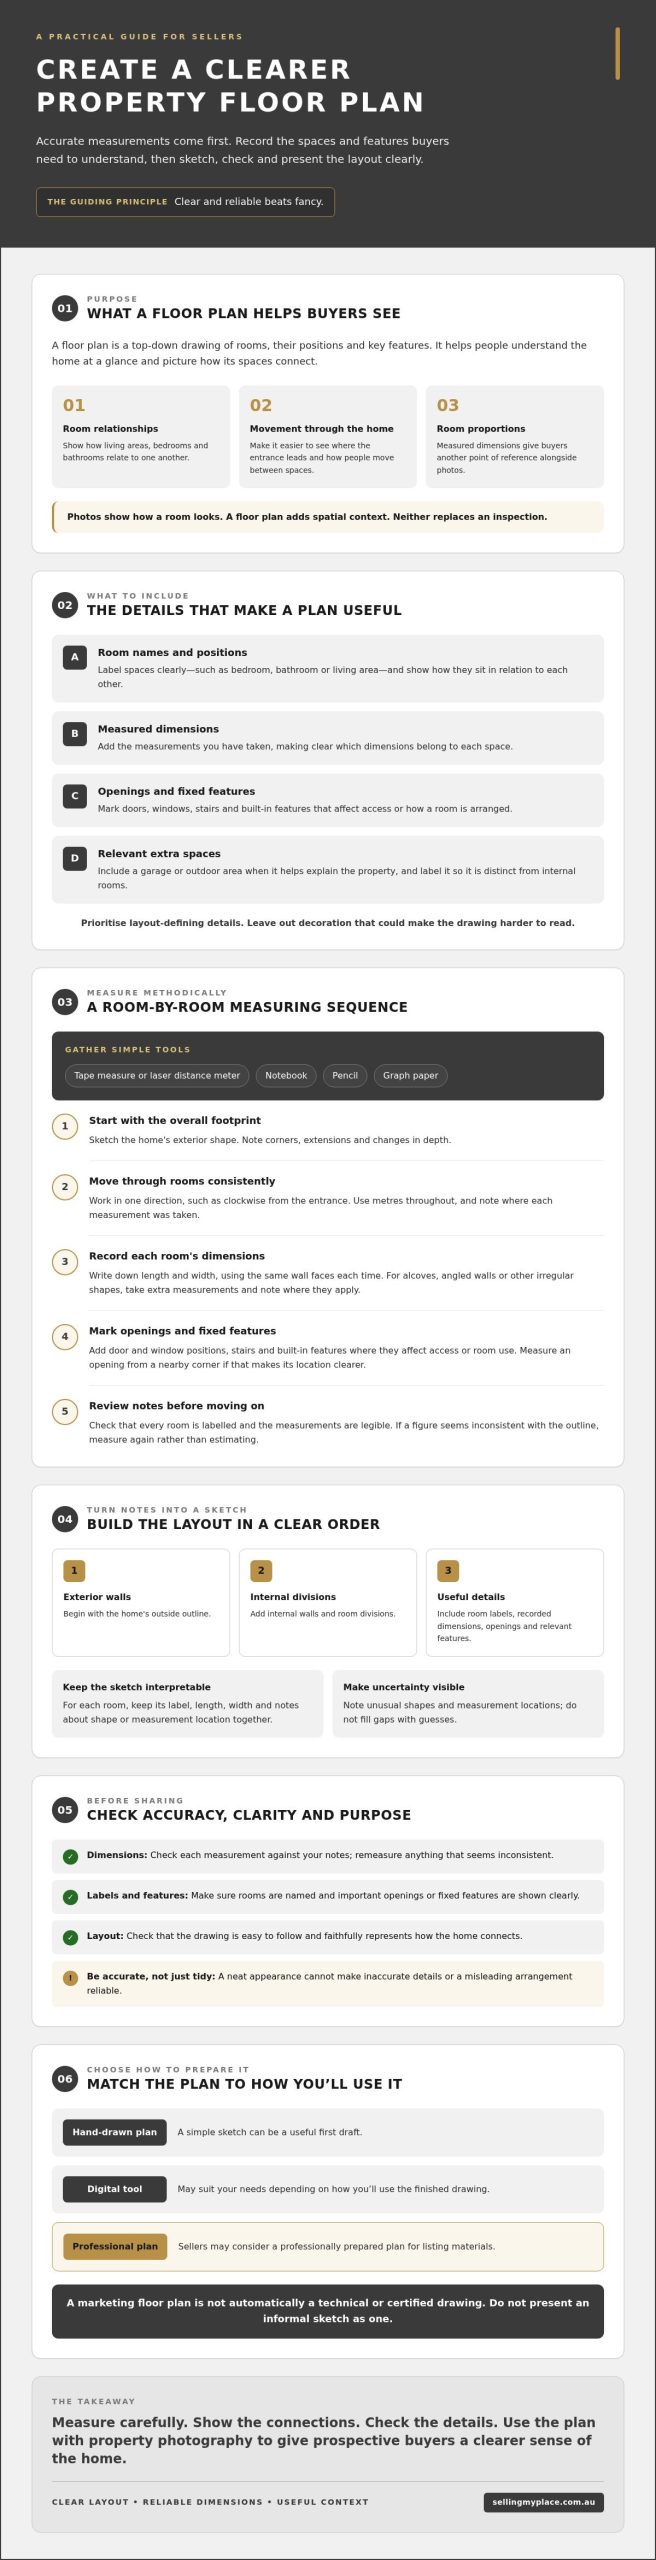
You don’t need design expertise to make a useful start. Pay attention to how rooms connect, where people enter and move through the home, and which features shape the layout. A property floor plan is a top-down drawing showing rooms, their positions and key features, helping someone understand the home at a glance.
The Floor plan reference explains the common elements of this kind of drawing. For a property listing, the purpose is practical: help buyers picture the layout and compare spaces. A marketing floor plan isn’t automatically a technical or certified drawing, so don’t present an informal sketch as one. For a broader look at how plans fit into presenting a home for sale, see this residential property listing services guide.
What details belong on a property floor plan?
As you consider how to create a property floor plan, focus on details that help readers interpret the layout without cluttering the page. Include:
- Room names and positions: Label spaces clearly, such as “bedroom”, “bathroom” or “living area”, and show how they relate to one another.
- Measured dimensions: Add room measurements you’ve taken, and make clear which dimensions belong to each space.
- Layout features: Mark doors, windows and stairs, along with built-in features that affect how a room is arranged or accessed.
- Relevant extra spaces: Show a garage or outdoor area if it helps explain the property, and label it so readers can distinguish it from internal rooms.
Not every detail needs to appear. Prioritise features that change how someone understands the home, and leave out decorative touches that could make the drawing harder to read.
How a clear plan helps a buyer understand the home
Photos can show a bright kitchen or welcoming lounge, but they don’t always explain where those rooms sit in the overall layout. A plan can show whether the living area connects directly to the kitchen, how bedrooms relate to the bathroom, and where the main entrance leads. Buyers can use those relationships to picture everyday movement, from bringing shopping inside to moving between shared and private spaces.
Room dimensions also give readers a way to compare proportions. A bedroom may look spacious in a carefully framed photo, while its measurements offer another point of reference. Neither gives a complete experience of the property, and a floor plan doesn’t replace an inspection. It adds spatial context.
Clear labels and reliable dimensions help buyers understand the layout without guesswork. Keep the drawing honest: a neat presentation is helpful, but it can’t make inaccurate measurements or a misleading arrangement reliable.
How to measure your home and sketch a property floor plan
A dependable sketch starts with a repeatable method, not a perfect drawing. As you work through how to create a property floor plan, measure each space carefully, write figures down straight away and mark anything unusual rather than filling gaps with guesses.
Prepare a simple room-by-room measuring checklist
Gather a tape measure or laser distance meter, notebook, pencil and graph paper. Start with the home’s overall footprint, then move through the rooms in one consistent direction, such as clockwise from the entrance. Use metres throughout, and note where each measurement was taken so you can interpret it later.
- Sketch the outline. Draw the exterior shape of the home, noting corners, extensions or changes in depth.
- Measure each room. Record its length and width, using the same wall faces each time. For alcoves, angled walls or other irregular shapes, take extra measurements and note where they apply.
- Record openings and fixed features. Add door and window positions, stairs and built-in features where they affect access or room use. Measure the position of an opening from a nearby corner if that will make its location clear.
- Review your notes. Check that every room is labelled and the measurements are legible. If a figure seems inconsistent with the outline, measure again rather than estimating.
A room-by-room checklist can help you avoid missing spaces or repeating measurements. For each room, leave space for its label, length, width and any notes about shape or measurement location. The how to draw a floor plan guide also outlines a practical approach to measuring spaces and adding features.
Sketch the layout without losing important details
Draw exterior walls first, then add internal walls and room divisions. Your first sketch doesn’t need to be to scale. Focus on representing the layout faithfully and leaving enough space for notes. Mark entrances, doors, windows and stairs with simple, consistent symbols, and label rooms as you go.
Include a key for symbols that might not be obvious. Leave space beside each room for dimensions and notes, and show which way a door opens only if it helps explain movement through the space. These details can make the difference between a sketch that’s easy to follow and one that leaves buyers guessing.
Once the measurements and rough layout are in place, decide whether to refine the sketch yourself or consider a professional floor plan for listing materials. If you’re preparing a property for sale and want to discuss floor plans, contact the team.
How to turn your measurements into a clear, scaled floor plan
Once you’ve checked your measurements, turn them into a drawing that’s easy to read. Scale is the relationship between a real measurement and the size shown on the page. For example, if you choose a scale where 1 cm represents 1 m, a 4 m wall should appear 4 cm long.
Scale keeps drawn proportions connected to recorded measurements. Use the same scale throughout the plan. Otherwise, rooms may look larger or smaller than they are in relation to one another. A scaled drawing can still contain errors, so check it against your notes rather than assuming the method or tool has made it accurate.
Choose a drawing method that suits your needs
Graph paper is a straightforward option for a low-tech draft. Use its grid to keep lines consistent, and revise the drawing as you confirm dimensions. Digital drawing tools can make labels, resizing and repeated edits easier. If you’re preparing a property listing and presentation quality or time is a concern, consider having the plan professionally prepared.
| Method | Effort | Editing ease | Suitability for a listing |
|---|---|---|---|
| Graph-paper sketch | Hands-on drafting | Simple to mark up, but redraws may take time | Useful as a clear draft; presentation depends on the finished drawing |
| Digital template or drawing tool | Time to learn the tool and enter measurements | Often convenient for changing labels and layout | Can work if checked carefully and presented clearly |
| Professionally prepared plan | Less drawing work for you; requires arranging preparation | Ask how corrections can be made | An option when a polished listing presentation matters |
No method guarantees accuracy. Your measurements and review are what keep the plan faithful to the home.
Add scale, labels and visual hierarchy
Use consistent line styles for walls, openings and other features, and include a key if any symbols might be unclear. Keep room names and dimension labels readable, with enough space that they don’t crowd the drawing. Use the same names throughout, such as “living room”, rather than switching between labels for the same space.
As you decide how to create a property floor plan, aim for clarity over decoration. Buyers should be able to find room names, understand proportions and follow the layout without having to decipher the page.
How to check a DIY property floor plan before sharing it
A DIY floor plan can be useful for property marketing if you check the measurements and describe the plan’s limitations honestly. A polished appearance is no substitute for accurate dimensions or a layout that reflects the home. Treat your drawing as a guide to understanding the spaces, not as a technical document. If you need it for a technical purpose, check the requirements with the relevant professional or organisation first.
A practical accuracy check before you publish
Before adding the plan to marketing materials, compare it with your notes and the home itself. Re-measure a selection of rooms, including any with unusual shapes, and confirm that the figures match. Then check the positions of doors, windows and stairs, along with the connections between rooms. A second pair of eyes can help: ask someone unfamiliar with the property to follow the layout and point out anything confusing.
- Dimensions: Do the figures match your recorded measurements? Are approximate dimensions clearly identified?
- Layout: Are the room connections and positions of openings and stairs represented correctly?
- Labels: Are room names consistent and easy to read?
- Interpretation: Can someone unfamiliar with the home understand the plan without your explanation?
Common floor-plan mistakes and how to avoid them
Awkward corners are easy to simplify by accident. Don’t guess their shape or leave out a fixed feature if doing so could change how a buyer understands the room. Check that labels and dimensions remain readable, and make sure decorative elements don’t compete with the layout.
Be clear about what you’ve measured and what you’ve estimated. If some figures are approximate, say so plainly. Don’t present estimates as verified measurements. If a room’s shape or a dimension is uncertain, revisit it before sharing the drawing. An honest limitation is more useful than false precision.
As you decide how to create a property floor plan for a listing, remember that a DIY draft can be a helpful starting point, while a professionally prepared plan may suit sellers who want a more polished presentation. Kincade International Direct Sales offers floor plans as part of its property marketing services. Check the current scope and process if you’re considering this option.
For help preparing a property listing, contact the team about your listing.
How to use your finished floor plan in a property listing
A finished floor plan helps prospective buyers understand how the home fits together, while photography shows its appearance and atmosphere. Use the plan to add spatial context, not as a substitute for images. A buyer might see the kitchen in a photograph, then use the plan to understand how it connects to the dining or living area.
Before sharing the plan, check that it still reflects the property and that room names match the wording in the listing. If changes have been made since you measured, update the plan or arrange a fresh check. Sellers preparing the rest of their sale materials may also find this step-by-step guide to selling your own home helpful.
Prepare a floor plan for listing photos and property details
Choose a clean version that stays legible on a screen, where buyers may view it at different sizes. Keep room labels and dimensions clear, and avoid squeezing in decorative details that distract from the layout. Use consistent names across the plan and property details so readers don’t have to guess whether “family room” and “living room” refer to separate spaces.
Pair the plan with photographs that help people connect the layout with the rooms themselves. A photo can show the outlook from a bedroom, for example, while the plan explains where that bedroom sits in relation to the bathroom and living areas. Together, they offer complementary information and help buyers build a more complete picture before arranging an inspection.
When to ask for professional floor-plan support
Consider professional help if the layout is complex, you’re short on time, or you want a more polished asset for your listing. Before agreeing to a service, ask what measurements are taken, what review or checking steps are included, and what final materials you’ll receive. Confirm the current scope and process rather than assuming every provider prepares plans in the same way.
Kincade International Direct Sales’ property marketing services include floor plans, photography and residential property listings. If you’re deciding how to create a property floor plan for your sale, start with your own measurements, then consider what support would make the presentation clearer for buyers.
For questions about presenting your home for sale, find out more about property marketing support.
Present your property with a clearer picture
A useful floor plan doesn’t need elaborate design; it needs to represent the home faithfully. As you consider how to create a property floor plan, focus on recording measurements carefully, showing how rooms connect and checking the drawing before sharing it. A consistent scale and clear labels help buyers interpret the layout, while photographs add visual detail a plan can’t provide.
You can begin with a hand-drawn sketch, then decide whether a digital version or professional preparation better suits your listing. Kincade International Direct Sales offers floor plans alongside professional photography and residential property listings, bringing key marketing elements together. Check the current service scope and process to understand what’s included.
A thoughtful plan can make it easier for prospective buyers to picture the home and decide whether it may suit their needs. Discuss your property marketing needs with the team to take the next step towards presenting your home with confidence.
Frequently Asked Questions
How do you create a property floor plan yourself?
Start by sketching the home’s overall shape, then measure each room and note its position, doors, windows, stairs and fixed features. Record measurements in metres and label each space as you go. Transfer your notes to graph paper or a digital drawing tool, keeping proportions consistent if you’re working to scale. Before sharing the plan, compare it with your measurements and check that someone unfamiliar with the home can follow the layout.
What should be included in a property floor plan?
Include clearly named rooms, their relative positions and dimensions you’ve actually measured. Show doors, windows and stairs, along with built-in features that affect how people use or move through a space. Add a garage or outdoor area if it helps explain the property, and label it clearly. Focus on details that help readers understand the layout. Unnecessary decoration or unsupported measurements can make the plan harder to interpret.
Can I draw a floor plan without special software?
Yes. Graph paper, a pencil, a ruler and your measurements are enough to create a useful hand-drawn plan. Use the grid to keep walls and room proportions consistent, and leave space for labels and dimensions. If you need to change the drawing, make corrections legibly or redraw it. Digital tools are optional. They can make editing easier, but they don’t replace careful measuring and checking.
How do I measure a room for a floor plan?
Measure the room’s length and width from wall to wall, using a tape measure or laser distance meter, and write each figure down immediately. Keep measurements in metres and note where each one was taken. For an alcove, angled wall or irregular room, record extra lengths to show the shape rather than treating it as a simple rectangle. Measure door and window positions too if they clarify access or how the room is arranged.
Does a property floor plan need to be drawn to scale?
A plan for personal reference can be a rough sketch, but consistent scale makes proportions easier to understand. Scale means drawn lengths represent real measurements in the same ratio throughout the plan. For example, if 1 cm represents 1 m, a 3 m wall should be drawn 3 cm long. Label dimensions clearly, and remember that a scaled drawing can still be inaccurate if its measurements or layout are wrong.
Should I make my own floor plan or hire a professional?
Make your own plan if you can measure the spaces carefully and need a straightforward drawing for general understanding. Consider professional preparation if the layout is complex, you’re short on time or you want a polished asset for a property listing. Before engaging a provider, ask what measurements, checking steps and final materials are included. A marketing plan isn’t automatically a technical drawing, so check requirements for any other intended use.
How can I check whether my floor plan is accurate?
Compare the drawing with your notes and re-measure rooms where a figure seems uncertain, especially spaces with unusual shapes. Check that room connections, doors, windows and stairs appear in the right places, and make sure labels match the property details. Then ask someone unfamiliar with the home to interpret the plan. If any dimensions are estimates, identify them clearly rather than presenting them as measured figures.
