How to Stage Your Home for Photos: 2026 Australian Guide
In the 2026 Australian property market, you aren’t just staging for a person; you are staging for a lens. With digital scrolls lasting barely a second, your home’s digital kerb appeal is the only thing standing between a high-value offer and a missed opportunity. Learning how to stage a home for photos is no longer about making a room look “nice” in person; it’s about mastering the geometry of a wide-angle shot and the flow of natural light to create an emotional connection before a buyer even steps through the front door.
It’s completely normal to feel overwhelmed by the volume of belongings in your cupboards or to worry that your lounge room looks small and dark in your own test snaps. You want to showcase the beautiful life you’ve built without losing your hard-earned equity to expensive staging companies or high agent commissions. We understand that this is a major life transition, and the pressure to get the presentation right can feel heavy when so much is at stake.
This guide reveals the professional secrets to transforming your property into a magazine-quality listing that drives physical inspections while saving you an average of A$20,000 in commissions. We will walk through everything from strategic decluttering and lighting hacks to the specific repairs that actually add value before our professional photographer arrives. By the end, you’ll have the confidence to prepare a canvas that speaks directly to a buyer’s aspirations.
Key Takeaways
- Master the psychology of “digital kerb appeal” to capture a buyer’s attention in the crucial first second of their smartphone scroll.
- Learn the “camera-first” strategy to ensure your rooms look spacious and balanced through a wide-angle lens, even if the layout feels slightly different in person.
- Discover room-by-room techniques that transform your house from a lived-in family home into an aspirational lifestyle that buyers can’t wait to inspect.
- Follow a comprehensive pre-photography checklist on how to stage a home for photos that focuses on de-personalising your space while maintaining its heartfelt warmth.
- Understand how to leverage professional photography and floorplans through a flat-fee model to protect your equity and save an average of A$20,000 in commissions.
The Psychology of Digital Kerb Appeal in 2026
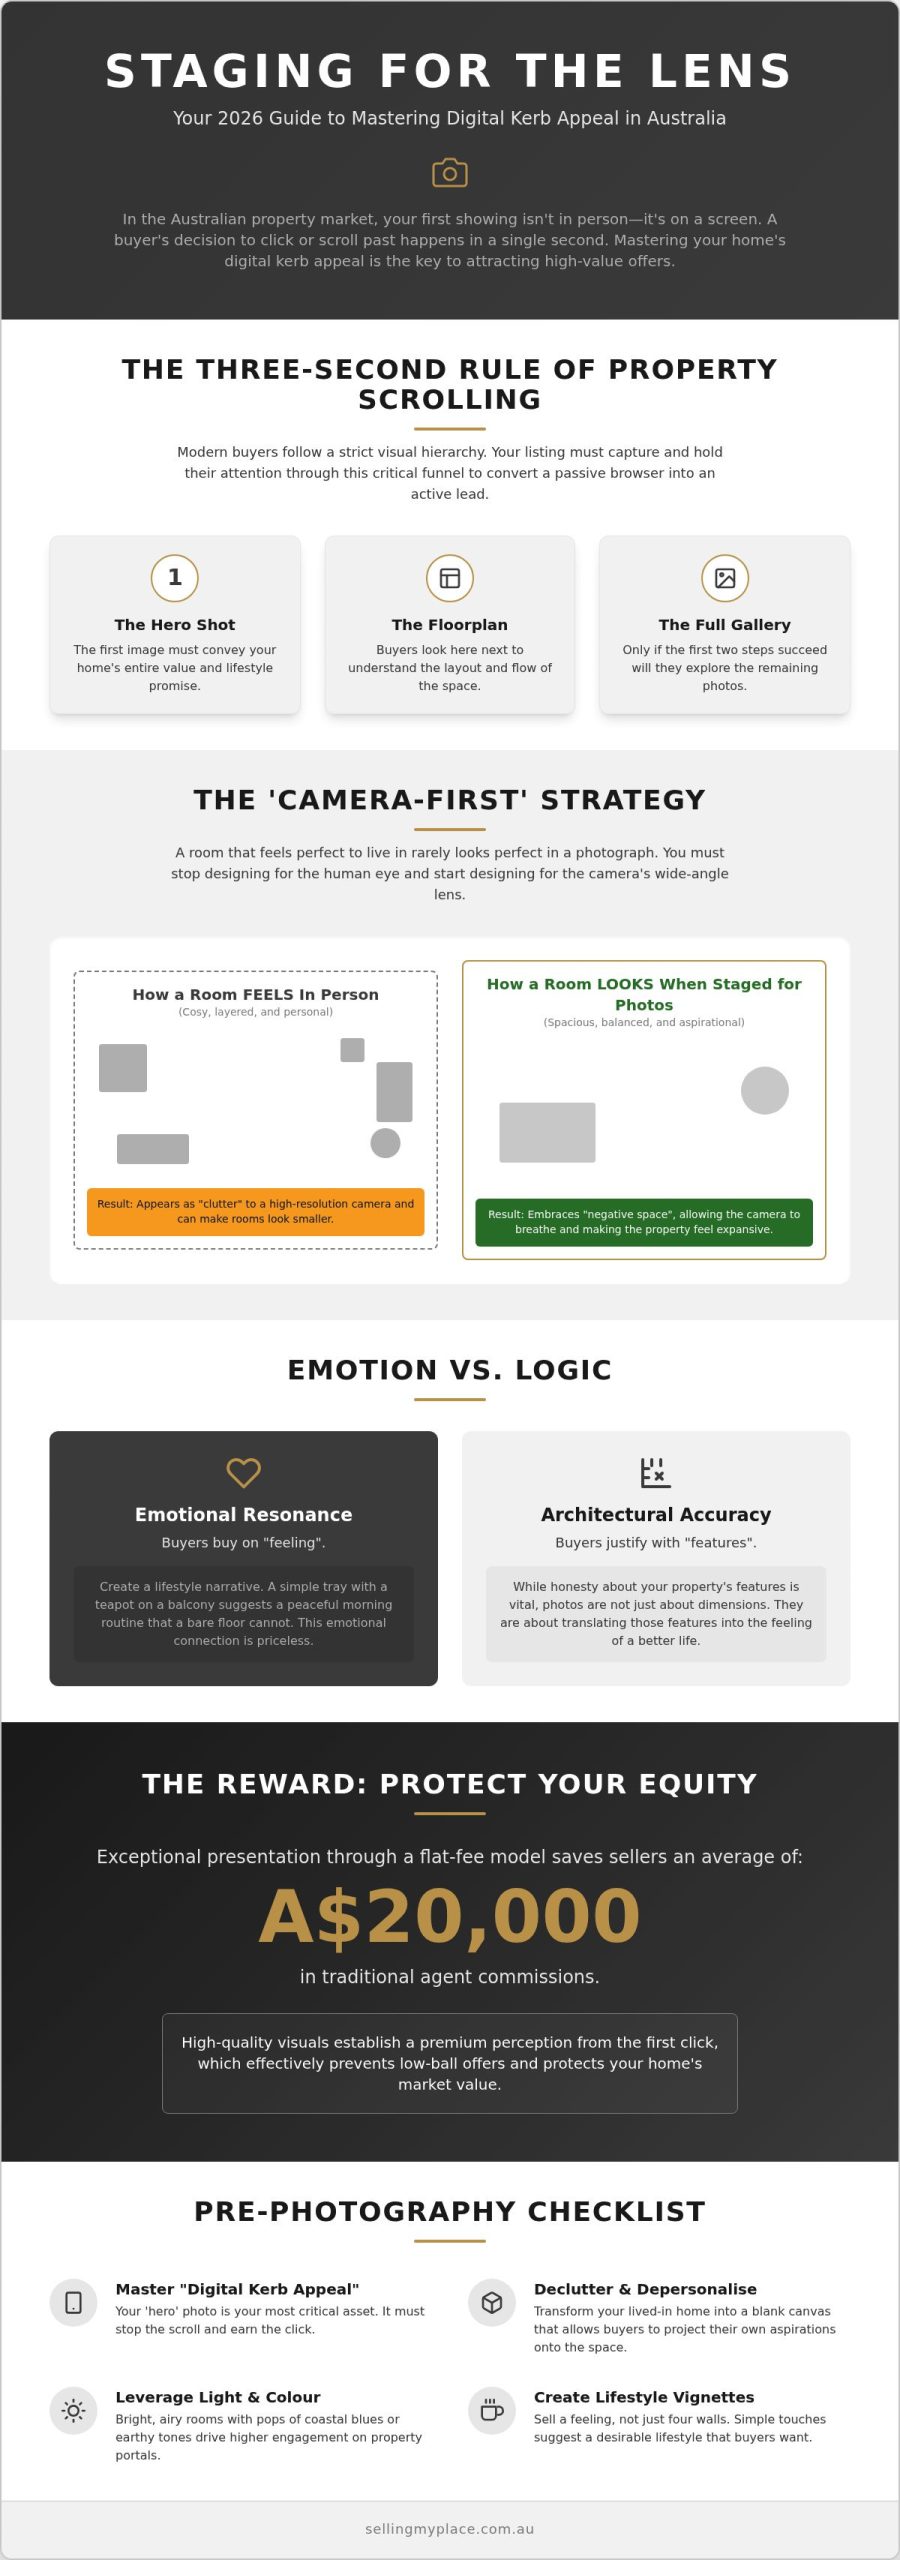
In the current Australian market, the physical front gate is no longer where the first impression happens. Instead, it occurs on a high-resolution smartphone screen during a late-night scroll. This phenomenon, known as digital kerb appeal, represents the split-second decision a buyer makes to either click for more details or swipe past your listing forever. If you are learning how to stage a home for photos or researching what is home staging in a modern context, it’s the art of capturing that initial interest through a lens.
Your “hero” photo is the most critical asset you own. It must communicate your home’s entire value proposition, from its architectural charm to its promise of a better life. In 2026, buyers are filtering properties based on “lifestyle vibes” rather than just checking off bedroom counts. They want to see themselves hosting a Sunday afternoon barbecue or working from a sun-drenched home office. We see ourselves as your partner in this process, providing a steady hand to help you navigate these high-stakes decisions. High-quality visuals protect your equity by establishing a premium perception early, which effectively prevents “low-ball” offers that often stem from poor presentation.
The Three-Second Rule of Property Scrolling
Modern buyers follow a strict visual hierarchy: they look at the hero shot, then the floorplan, and only then do they explore the rest of the gallery. Digital kerb appeal is the primary funnel for modern real estate, acting as the gateway that converts a passive browser into an active lead. Lighting and colour contrast are your best friends here. A bright, airy lounge room with pops of Australian coastal blues or earthy tones will naturally drive higher click-through rates on major portals compared to a dark, cluttered space. It’s about creating a sense of calm confidence that reassures the viewer before they’ve even read the description.
Emotional Resonance vs. Architectural Accuracy
While it’s vital to be honest, property photos aren’t just about architectural accuracy; they’re about emotional resonance. Buyers buy on “feeling” but later justify the purchase with “features”. Knowing how to stage a home for photos involves creating a lifestyle narrative. Think about the “tea on the deck” effect. A simple vignette of a tray with a teapot and two cups on a balcony suggests a peaceful morning routine that a bare floor simply cannot. This emotional connection directly impacts how to determine market value of a home in australia, as perceived value often rises when a buyer feels an immediate bond with the space.
The ‘Camera-First’ Strategy: Designing for the Lens
There is a fundamental truth in real estate: a room that feels perfect to live in rarely looks perfect in a photograph. When you are learning how to stage a home for photos, you must stop designing for the human eye and start designing for the camera sensor. The lens sees the world in two dimensions, which means depth, height, and space must be manufactured through clever positioning. What feels like a warm, layered lounge room in person often translates as “clutter” to a high-resolution camera.
Professional photographers almost exclusively use wide-angle lenses to capture the full breadth of a room. While effective, these lenses create a specific type of distortion where objects at the very edge of the frame appear stretched. To manage this, we recommend keeping the immediate foreground and extreme corners of your rooms clear of bulky furniture. Embracing “negative space” is your best friend, particularly in smaller Australian apartments or units. By leaving sections of the floor and walls bare, you allow the camera to “breathe,” making the property feel expansive rather than enclosed. If you need a helping hand with your layout, our pre-sale consulting team can provide tailored advice to ensure your home looks its absolute best.
Composition is the final piece of the puzzle. Using the “Rule of Thirds” or creating strong symmetry helps anchor a viewer’s gaze. A pair of matching bedside lamps or perfectly centred cushions on a sofa creates a sense of order and stability that reassures potential buyers. Mastering styling for the camera is about removing the “noise” so the home’s true character can shine through the screen.
Furniture Re-orientation for Depth
To create a sense of three-dimensional depth on a flat screen, try pulling your furniture a few centimetres away from the walls. This creates subtle shadows and prevents the room from looking “flat.” You should also aim for a “V-Shape” arrangement. By angling armchairs slightly toward each other but keeping them open toward the photographer’s entry point, you invite the viewer into the space. Ensure there are clear, unobstructed “walk-through” paths that the camera can follow toward a primary focal point, like a fireplace or a garden view.
Lighting: The Secret to Professional-Grade Shots
The Australian sun is a powerful tool, but it can be temperamental. While “Golden Hour” is spectacular for exterior shots, midday or slightly overcast light is often superior for interiors as it provides even, soft illumination without harsh shadows. Most professionals prefer a “natural light only” approach. Turn off your indoor globes to avoid “colour cast” (that sickly yellow or blue tint) and let the daylight do the work. Removing heavy window treatments or bulky pelmets is a quick way to highlight a seamless connection to the outdoors, which is a high-priority feature for local buyers in 2026.
Room-by-Room Staging: Creating a Cohesive Visual Narrative
Room-by-room staging is where you translate the “camera-first” theory into tangible, heart-warming scenes. Each space must contribute to a cohesive visual narrative that makes a buyer think, “I could belong here.” When you are figuring out how to stage a home for photos, remember that you aren’t just selling a floorplan; you are selling a Saturday morning. It is about creating a sense of possibility that resonates with a buyer’s own family goals and lifestyle aspirations.
The kitchen should transition from a functional workplace to a vibrant social hub. Instead of hiding every appliance, use the “Rule of Three” on benchtops: perhaps a designer kettle, a matching toaster, and a single organic element like a bowl of fresh lemons or a timber board with a crusty loaf of bread. In the living area, use large rugs to anchor the space and create “conversational” seating clusters. This helps the camera understand the room’s scale and purpose instantly, turning a large, empty box into a welcoming heart of the home. Don’t forget the master suite; it should feel like a high-end hotel sanctuary, achieved through layered textures and neutral, high-thread-count bedding.
In our local market, the outdoor alfresco area is often the hero of the sale. Because we value the sun and the breeze, the backyard is essentially your most important “room.” Ensure your deck or patio is scrubbed clean and styled with comfortable furniture to highlight that quintessential Australian indoor-outdoor flow. To achieve this level of finish, you can learn more about Squirtz Property Detailing and their professional maintenance services. The process of how to stage a home for photos is truly about removing the “daily life” and replacing it with an “aspirational life” that feels both achievable and deeply desirable.
The Kitchen and Dining: The Heart of the Sale
Modern 2026 preferences lean toward minimalist elegance. For your dining table, skip the full formal place settings, which can feel a bit “staged” and dated. Instead, opt for a simple linen runner and a single, striking centrepiece. It is also vital to ensure your kitchen’s flow to the living area is clear. Since professional floorplans are included in our service, use your staging to physically mirror what the plan shows, helping the buyer’s brain connect the digital layout to the beautiful images they are seeing.
Bathrooms and Laundries: The ‘Spa’ Transformation
In the bathroom, the “White Towel” mandate is absolute. Colourful or patterned towels are a photographic risk; they can date a space or clash with the tiles. Remove all personal hygiene cues like toothbrushes, half-used soap bars, and bath mats. Spa-like bathrooms increase the perceived stability of the home’s maintenance, suggesting a property that has been cared for with a steady, attentive hand. A small orchid or a high-quality candle is all the “personality” a bathroom needs for the camera.
The ‘Work from Home’ Nook
By 2026, a dedicated workspace is a non-negotiable for most Australian professionals. Even if you don’t have a full office, you must stage a visible “nook” in your photos. Focus on styling the “Zoom Background” for potential buyers; a tidy desk, a comfortable ergonomic chair, and a bookshelf with a few curated titles can make a small corner look like a productive powerhouse. It’s about showing the buyer that this home can support their modern, flexible lifestyle without compromise.
The Ultimate Pre-Photography Checklist: Small Details, Large Returns
While the heavy lifting of furniture arrangement is behind you, the final polish is what truly separates a basic listing from an aspirational lifestyle. High-resolution cameras in 2026 are incredibly unforgiving; they will find the stray fingerprint on the stainless steel fridge or the tangled charging cable snaking behind the bedside table. This stage of how to stage a home for photos is about refinement. It is about removing the evidence of your daily routine so the buyer can begin to imagine their own. We recognise that this can feel like a lot to manage, but these small efforts are what protect your equity and drive those high-value offers.
De-personalisation is a sensitive step. You’ve built a beautiful life here, and removing family photos can feel like you’re stripping away the home’s heart. Instead, try to view it as creating a clear canvas for the next family’s legacy. Replace personal snapshots with neutral art or mirrors that help bounce natural light around the room. Similarly, the “pet-free” illusion is vital. Even the most dedicated animal lovers don’t want to see a dog bed in the corner or nose prints on the sliding glass doors during their digital tour. Hide the bowls, stow the leashes, and give all glass and high-gloss surfaces an “invisible” clean that won’t catch the photographer’s flash.
The exterior needs a “glow-up” to match the interior. A quick pressure wash of the driveways and a fresh layer of dark mulch in the garden beds can make the property look significantly more well-maintained on screen. If you’re feeling a bit stuck on these final touches, our pre-sale consulting experts are here to guide you through the process with a steady, experienced hand.
The 60-Minute Pre-Shoot ‘Sprint’
In the hour before our photographer arrives, focus on stowing the “tech-clutter.” Hide every remote control, unplug charging cables, and ensure tablets are out of sight. Plump every cushion on the sofa and give them a “karate-chop” in the centre for that crisp, designer look. Crucially, check every light globe in the house. They should all be working and, ideally, should all be the same colour temperature, such as “Warm White,” to ensure the room looks cohesive and inviting in the final images.
The ‘Sniff Test’ and Visual Freshness
While the camera can’t smell, it can certainly see the “visual weight” of heavy scents like thick incense or strong candles. Avoid these and instead open every window to let in the fresh Australian air. For a touch of life, use the “greenery hack.” A few clippings of native Australian flora, like Eucalyptus or Banksia, placed in a simple glass vase can fill an empty corner beautifully without costing a cent. For a more detailed breakdown of these final steps, see our A Seller’s Checklist for a Successful Photo Shoot. Knowing exactly how to stage a home for photos ensures you don’t miss the tiny details that lead to the largest returns.
Partnering for Success: Professional Photography and Commission-Free Selling
You have done the hard work of decluttering, plumping cushions, and mastering the “camera-first” layout. Now, it is time to ensure that effort isn’t wasted. Many independent sellers fall into the trap of using a smartphone to capture their listing. While modern phones are impressive, DIY smartphone photos are the primary equity-killer for independent sellers in 2026. A phone lens cannot replicate the depth, light-balancing, and architectural straightness provided by professional equipment. Poorly lit or distorted images signal to buyers that you might be looking for a “quick and cheap” exit, which often invites low-ball offers that eat into your profit.
This is where the Kincade International Direct Sales (KIDS) model changes the game. We believe that selling your own home doesn’t mean doing it alone; it means using better tools. Our flat-fee service includes professional photography and floorplans as standard, ensuring your staged canvas is captured with the precision it deserves. We act as your “steady hand” throughout this transition, providing the professional infrastructure you need while you retain the equity you’ve built. By removing the traditional agency commission, our sellers save an average of A$20,000, which is a significant sum that stays in your pocket rather than being handed over at settlement.
Our partnership approach extends to pre-sale property consulting. If you are still unsure how to stage a home for photos or want a second pair of eyes on your lounge room layout, our experts are available to guide you. This ensures your home is “lens-ready” before our photographer even arrives. Once those high-end images are ready, they power a global marketing network that puts your property in front of qualified buyers without the burden of high marketing costs or hidden fees.
The KIDS Marketing Suite: Beyond the Photo
A beautiful photo gallery is only one part of a high-converting listing. To provide a complete picture, we integrate your staged photos with professional floorplans. This allows buyers to mentally “walk through” the home, connecting the visual appeal of your styling with the practical flow of the house. These professional visuals also feed into our Neighborhood Market Reports. When you present a polished, magazine-quality listing backed by hard data, you justify your asking price and command respect from the market. The “Sale by Owner” revolution is about homeowners keeping their hard-earned profit by taking charge of the “heart work” of staging while we handle the technical heavy lifting.
Next Steps: Your Journey to a Commission-Free Sale
Ready to move from preparation to presentation? Booking your professional shoot through the KIDS platform is a simple, streamlined process designed to reduce the stress of listing. Before the camera clicks, you can access our Agent Advisory Service for a final “staging critique.” We will help you fine-tune the details, ensuring your native greenery is positioned perfectly and your “Zoom nook” looks its best. The goal is to make sure every pixel of your listing works toward a premium result. If you are how to stage a home for photos and ready to showcase your home to the world, Contact our expert team at Selling My Place today.
Step into Your Next Chapter with Confidence
Mastering how to stage a home for photos is about more than just tidy rooms; it’s about shifting your perspective from homeowner to curator. By embracing a camera-first strategy and focusing on those high-impact details like natural light and native greenery, you’ve prepared a canvas that speaks directly to a buyer’s aspirations. You’ve done the heart-work of preparing the space, and now it’s time to let the professional tools do the rest of the heavy lifting. Selling your property is a significant life transition, and you deserve a partner who respects both your home’s legacy and your financial future.
Our flat-fee, 0% commission model is designed to empower you. By choosing a smarter way to sell, our clients save an average of A$20,000 in commissions while still receiving the premium marketing essential for a top-tier result. With professional photography and detailed floorplans already included in your package, you can present a high-value listing that truly stands out in the 2026 market. We are here to provide the steady hand and expert guidance you need to secure your equity and move forward with peace of mind. Maximise your sale price with professional photography; book your commission-free listing today. Your success is our priority, and we can’t wait to help you showcase your home to the world.
Frequently Asked Questions
Should I empty my house before taking professional photos?
No, we generally recommend keeping your furniture in place. Empty rooms often look smaller and lack the emotional heart that buyers look for when scrolling. By following our advice on how to stage a home for photos, you can use your existing belongings to create a lived-in yet aspirational feel. If a house is completely bare, it’s much harder for a buyer to visualise how their own life fits in.
How much does professional home staging cost in Australia compared to doing it myself?
Professional staging services in Australia, such as InSitu Furniture Presentation, typically range from A$2,000 for small units to over A$10,000 for large family homes. By managing the process yourself, you save these significant upfront costs while still achieving a high-end result. Our flat-fee model supports this empowerment, including the professional photography and floorplans you need to showcase your hard work without the burden of traditional agency commissions or high marketing fees.
Do I need to stage the garage or the inside of the cupboards for the shoot?
You typically don’t need to stage the inside of cupboards or the garage unless they are a standout feature. Photographers focus on primary living zones, bedrooms, and bathrooms. However, ensuring the garage is tidy and free of large piles of rubbish is a good idea, as a quick shot might be taken to show capacity. Generally, keep your hidden storage areas organised enough to avoid any unsightly overflows during the shoot.
What is the best time of day for a real estate photographer to visit?
For interior shots, midday or slightly overcast light is often best as it provides even, natural illumination without harsh shadows. If your property has spectacular views or a beautiful garden, a twilight session can add a touch of magic to the hero exterior shot. Your photographer will usually coordinate the best time based on your home’s orientation to ensure the Australian sun highlights your property’s best features rather than washing them out.
Can’t I just use a ‘Virtual Staging’ service instead of moving furniture?
Virtual staging is a useful tool for completely empty properties, but it can lead to a sense of disappointment when buyers visit for a physical inspection. Real furniture creates a tangible atmosphere that virtual renders simply can’t replicate. When you learn how to stage a home for photos using physical items, you build a consistent experience from the first digital click through to the final walk-through, which helps establish genuine trust.
What should I do with my pets during the property photo shoot?
It is best to have your pets out of the house during the photography session. This prevents them from accidentally appearing in shots or creating motion blur in the background. It also allows the photographer to move freely through the rooms without worrying about an open door or a curious cat. Removing pet beds and bowls before the shoot ensures the focus remains entirely on the home’s features rather than the animals.
Should I leave the TV on or off during the photography session?
Keep the TV turned off during the shoot. A large black screen can look like a void in photos, but a glowing screen with a random show or reflection is even more distracting. Professional photographers sometimes use digital editing to add a subtle, neutral image to the screen later, but for the session itself, off is the standard. This keeps the viewer’s attention on the room’s proportions and your beautiful styling rather than a flickering screen.
How many photos do I actually need for a standard Australian property listing?
Most standard Australian property listings thrive with between 12 and 20 high-quality images. You want enough to tell a complete story of the home without overwhelming the buyer. This usually includes a hero exterior, two shots of the main living areas, one of the kitchen, and one for each bedroom and bathroom. Quality always trumps quantity; a few stunning, well-staged photos are far more effective than dozens of repetitive or poorly composed shots.
